How to Decrease Disk Usage in Windows 11?
To decrease disk usage in Windows 11, disable the SysMain service, limit startup programs, and turn on Storage Sense to clean junk files. These simple fixes can quickly reduce 100% disk usage and improve overall system speed. If problems continue, try updating drivers, running disk checks, or upgrading to an SSD.
What Is High Disk Usage in Windows 11?
High disk usage means your computer’s hard drive works too hard. When Task Manager shows 100% disk usage, your PC becomes slow and may freeze. Windows 11 disk usage at 100% means your laptop or PC’s hard drive is fully utilized and can no longer execute any further commands or process data.
According to Microsoft’s official documentation, normal disk usage should stay below 20% most of the time. If it hits 100% and stays there, you need to fix it fast.
Signs Your PC Has High Disk Usage
- Computer runs very slowly
- Programs take long time to open
- Windows freezes or crashes
- Fan runs loudly all the time
- Task Manager shows orange disk usage numbers
How to Check Your Disk Usage
Open Task Manager to see which programs use your disk. Press Ctrl + Shift + Esc to open Task Manager. Click the “Processes” tab and look at the “Disk” column. Any process that takes more than 1 to 2 MB could be a problem.
Programs with orange numbers in the disk column use too much disk space. Write down these program names so you can fix them.
Why Does Windows 11 Have High Disk Usage?
Windows 11 high disk usage happens for many reasons. The most common causes include:
- SysMain service running too much
- Too many startup programs
- Windows Search indexing files
- Virus or malware infections
- Old or broken drivers
- Not enough RAM memory
- Hard drive has bad sectors
From user reports so far, it seems the major reason behind 100% disk usage in Windows 11 is indeed the SysMain service.
How to Decrease Disk Usage in Windows 11
Disable SysMain Service
SysMain causes the most disk usage problems in Windows 11. This service tries to make apps load faster by keeping them in memory. But it can use too much disk space.
Here’s how to turn off SysMain:
- Press Windows + R keys
- Type “services.msc” and press Enter
- Find “SysMain” in the list
- Double-click SysMain
- Change “Startup type” to “Disabled”
- Click “Stop” button
- Click “Apply” then “OK”
- Restart your computer
You will instantly notice that Disk usage is reduced to 10-15% in Windows 11 after turning off SysMain.
Use Storage Sense to Clean Files
Storage Sense cleans junk files automatically. According to Microsoft Support, Storage Sense can automatically free up drive space for you by getting rid of items that you don’t need, like temporary files and items in your Recycle Bin.
To turn on Storage Sense:
- Press Windows + I to open Settings
- Click “System” then “Storage”
- Turn on “Storage Sense”
- Click “Configure Storage Sense”
- Set it to run “During low free disk space”
- Choose how often to delete temp files
- Click “Clean now” to start cleaning
Storage Sense removes these files safely:
- Temporary files
- Recycle Bin contents
- Old Windows update files
- Downloads folder files (if you want)
Stop Unnecessary Startup Programs
Too many startup programs slow down your disk. These programs start when Windows boots up and keep running in the background.
To disable startup programs:
- Press Ctrl + Shift + Esc to open Task Manager
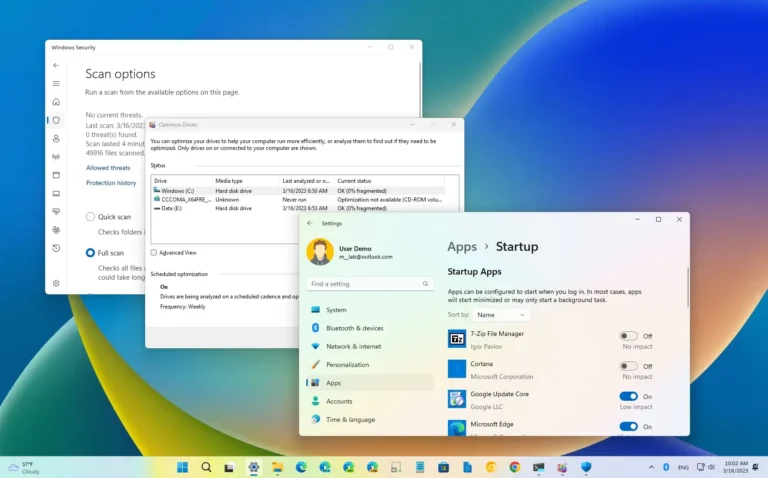
- Click “Startup” tab
- Look for programs you don’t need at startup
- Right-click these programs
- Choose “Disable”
- Restart your computer
Focus on programs with “High” startup impact first. Keep important programs like antivirus software enabled.
Disable Windows Search
Windows Search can cause high disk usage. This service indexes all your files to make searching faster. But it can use too much disk space on some computers.
To disable Windows Search:
- Press Windows + R keys
- Type “services.msc” and press Enter
- Find “Windows Search” in the list
- Double-click it
- Change “Startup type” to “Disabled”
- Click “Stop” button
- Click “Apply” then “OK”
- Restart your computer
Warning: Disabling Windows Search makes finding files slower. Only do this if disk usage stays high after other fixes.
Turn Off Scheduled Defragmentation
Windows 11 runs disk defragmentation automatically. While this helps your hard drive, it can cause 100% disk usage during the process.
To disable scheduled defragmentation:
- Press Windows key and search “defragment”
- Click “Defragment and Optimize Drives”
- Click “Change settings”
- Uncheck “Run on a schedule”
- Click “OK”
You can still run defragmentation manually when you want to. This stops it from running at random times.
Check for Viruses and Malware
Viruses cause high disk usage problems. Sometimes a virus or other malware can consume significant hard-drive space by corrupting your system files. Bad software can use your disk to mine cryptocurrency or steal data.
To scan for viruses:
- Press Windows + I to open Settings
- Click “Privacy & security”
- Click “Windows Security”
- Click “Virus & threat protection”
- Click “Quick scan” or “Scan options”
- Choose “Full scan” for best results
- Click “Scan now”
Let the scan finish completely. Remove any threats Windows Security finds.
Reset Virtual Memory Settings
Virtual memory problems can cause high disk usage. When your computer runs out of RAM, it uses hard drive space as extra memory. Wrong settings make this process use too much disk.
To reset virtual memory:
- Press Windows + R keys
- Type “sysdm.cpl” and press Enter
- Click “Advanced” tab
- Click “Settings” under Performance
- Click “Advanced” tab again
- Click “Change” under Virtual memory
- Uncheck “Automatically manage paging file size”
- Select “Custom size”
- Set Initial size to the recommended amount shown
- Set Maximum size to 1.5 times your RAM amount
- Click “Set” then “OK”
- Restart your computer
For example, if you have 8 GB of RAM, set maximum virtual memory to 12 GB (12,288 MB).
Update Storage Drivers
Old drivers cause disk usage problems. Storage drivers tell Windows how to talk to your hard drive. Outdated drivers can make your disk work too hard.
To update storage drivers:
- Press Windows + X keys
- Click “Device Manager”
- Expand “Disk drives”
- Right-click your disk drive
- Click “Update driver”
- Choose “Search automatically for drivers”
- Let Windows find and install updates
- Restart if asked
Also update drivers under “IDE ATA/ATAPI controllers” and “Storage controllers” sections.
Run Disk Check for Errors
Bad sectors on your hard drive cause high disk usage. Due to bad sectors or logical errors, the disk is unable to complete a given operation, and it continues to use the disk abnormally in an attempt to execute the action.
To check your disk for errors:
- Press Windows key and search “cmd”
- Right-click “Command Prompt”
- Choose “Run as administrator”
- Type: chkdsk /f /r C:
- Press Enter
- Type “Y” when asked
- Press Enter
- Restart your computer
The disk check runs when Windows starts up. This can take 30 minutes to 2 hours depending on your drive size.
Clean Temporary Files Manually
Temporary files pile up and use disk space. Windows and programs create temp files that should be deleted but sometimes stay on your computer.
To clean temp files manually:
- Press Windows + R keys
- Type “%temp%” and press Enter
- Press Ctrl + A to select all files
- Press Shift + Delete to remove files permanently
- Click “Yes” if asked
- Empty your Recycle Bin
Some files might not delete because programs are using them. This is normal – skip those files.
Use Cleanup Recommendations
Windows 11 has a new cleanup tool. Cleanup recommendations can help you identify and clean up temporary files and system files from your device.
To use Cleanup recommendations:
- Press Windows + I to open Settings
- Click “System” then “Storage”
- Click “Cleanup recommendations”
- Review all categories:
- Temporary files
- Large or unused files
- Files synced to cloud
- Unused apps
- Select items to remove
- Click “Clean up” for each section
This tool shows exactly how much space you’ll save before deleting files.
Perform Clean Boot
A clean boot helps find problem programs. This starts Windows with only basic programs running. If disk usage goes down, you know a startup program causes the problem.
To do a clean boot:
- Press Windows + R keys
- Type “msconfig” and press Enter
- Click “Services” tab
- Check “Hide all Microsoft services”
- Click “Disable all”
- Click “Startup” tab
- Click “Open Task Manager”
- Disable all startup programs in Task Manager
- Close Task Manager
- Click “OK” in System Configuration
- Restart your computer
If disk usage is normal after clean boot, enable programs one by one to find the problem program.
Advanced Solutions for Persistent High Disk Usage
Disable Connected User Experiences and Telemetry
This Windows service can cause high disk usage. Connected User Experiences and Telemetry is another service by Microsoft that runs under svchost.exe and is responsible for high disk usage in Windows 11.
To disable this service:
- Press Windows + R keys
- Type “services.msc” and press Enter
- Find “Connected User Experiences and Telemetry”
- Double-click it
- Change “Startup type” to “Disabled”
- Click “Stop” button
- Click “Apply” then “OK”
Disable MSI Mode for AHCI Controllers
Some storage controllers have MSI mode problems. According to Microsoft’s technical documentation, high disk usage can stem from Advanced Host Controller Interface PCI-Express (AHCI PCIe) controllers that have firmware incompatibility issues.
This fix is advanced and only works for computers using the “StorAHCI.sys” driver. Check Device Manager first to see if you have this driver before trying this fix.
Move Files to External Storage
Free up space by moving large files. Personal files such as videos, music, photos, and documents can take up a lot of space on your device.
Move these types of files to external drives:
- Videos and movies
- Music collections
- Photo libraries
- Old documents
- Downloaded files you don’t use
Keep files you use daily on your main drive for best performance.
How to Prevent High Disk Usage
Keep Windows Updated
Install Windows updates regularly. Updates fix bugs that cause high disk usage. Go to Settings > Windows Update and click “Check for updates” every week.
Use OneDrive Files On-Demand
OneDrive Files On-Demand saves disk space. OneDrive Files On-Demand stores a smaller placeholder file on your hard drive instead of the full-size file that’s stored in your OneDrive account in the cloud.
To turn on Files On-Demand:
- Right-click OneDrive icon in system tray
- Click “Settings”
- Check “Files On-Demand”
- Click “OK”
This keeps files in the cloud until you need them, saving local disk space.
Monitor Disk Usage Weekly
Check Task Manager once a week. Look for programs using more than 5 MB/s of disk space for long periods. Close or uninstall programs you don’t need.
Keep 15% Free Space
Always keep at least 15% of your disk free. When drives get too full, Windows can’t manage files properly. This causes high disk usage and slow performance.
When to Upgrade Your Storage
Consider SSD Upgrade
Solid State Drives (SSDs) perform better than hard drives. If you still use a traditional hard drive, upgrading to an SSD fixes most disk usage problems. SSDs are faster and don’t have moving parts that wear out.
Add More RAM
More RAM reduces virtual memory usage. According to Microsoft’s system requirements, Windows 11 needs at least 4 GB of RAM, but 8 GB or 16 GB works much better for most users. Adding more RAM can help avoid excessive disk usage by providing enough memory to run programs.
Troubleshooting Common Issues
What if disk usage stays at 100%?
Try these steps in order:
- Restart your computer
- Run a full virus scan
- Check for Windows updates
- Reset Windows 11 (keeps your files)
What programs normally use disk space?
These programs can use disk space normally:
- Windows Update downloading updates
- Antivirus scanning files
- File copying or moving
- Installing new programs
- System Restore creating restore points
Is 100% disk usage dangerous?
Long-term 100% disk usage can damage your drive. Research from storage industry experts shows that constant disk usage increases temperature and reduces drive lifespan. Fix the problem quickly to protect your computer and data.
Tools for Managing Disk Usage
Windows Built-in Tools
Windows 11 includes these helpful tools:
- Task Manager – See which programs use disk space
- Storage Sense – Clean files automatically
- Disk Cleanup – Remove system files manually
- Resource Monitor – Get detailed disk activity info
Third-Party Options
Consider these programs for advanced disk management:
- Disk defragmentation tools
- System optimization software
- Advanced file cleaners
- Storage analysis programs
Warning: Only use trusted software from known companies. Some “PC cleaner” programs contain malware.
Final Thoughts
High disk usage in Windows 11 is fixable with the right steps. Start with disabling SysMain service and using Storage Sense to clean files. These two fixes solve most disk usage problems.
If your disk usage stays high, work through the other solutions in this guide. Most users find success with the first few methods. For persistent problems, consider upgrading to an SSD or adding more RAM to your computer.
Remember to check your disk usage weekly using Task Manager. Catching problems early prevents them from getting worse. Keep your Windows 11 system updated and maintain at least 15% free disk space for best performance.
For more Windows 11 tips and troubleshooting guides, explore other articles on our site about app management and system optimization.
Regular maintenance keeps your Windows 11 PC running smoothly and prevents disk usage problems from coming back.