How to Speed Up Windows Boot Time Without Upgrading Hardware?
To speed up Windows boot time without upgrading hardware, enable Fast Startup, disable unnecessary startup apps, and clean temporary files regularly. These simple tweaks can reduce boot time by 30–50% on most systems. You can also adjust power settings, update drivers, and optimize system services to make startup faster without spending any money.
This guide shows you 12 proven methods to make your Windows computer start faster. These techniques work on both Windows 10 and Windows 11 without spending money on new parts.
What Causes Slow Windows Boot Times?
Slow boot times happen when your computer loads too many programs at startup. The average Windows boot time should be under 1 minute, but many computers take 3-5 minutes to fully start.
Common causes of slow boot include:
- Too many startup programs running automatically
- Fast Startup feature disabled in power settings
- Temporary files filling up disk space
- Outdated system files and corrupted cache
- Wrong BIOS boot order settings
- Background services using system resources
How to Enable Fast Startup in Windows
Fast Startup cuts boot time by saving your system state to a hibernation file. This Windows feature combines shutdown and hibernation to make your computer start faster.
Steps to Enable Fast Startup:
- Press Windows + R and type control panel
- Click Hardware and Sound > Power Options
- Select “Choose what the power buttons do”
- Click “Change settings that are currently unavailable”
- Check the box next to “Turn on fast startup (recommended)”
- Click Save changes
Fast Startup works by storing essential system files in memory during shutdown. According to Microsoft’s official documentation, this feature can reduce startup time by preloading essential OS components during shutdown.
Important: Fast Startup may interfere with Windows updates and dual-boot systems. If you experience update problems, disable this feature temporarily.
How to Disable Unnecessary Startup Programs?
Startup programs are apps that load automatically when Windows starts. Reducing the number of active startup programs is an effective way to get fast startup in Windows.
Using Task Manager Method:
- Press Ctrl + Shift + Esc to open Task Manager
- Click the Startup tab
- Right-click unwanted programs and select “Disable”
- Focus on programs marked “High” impact first
Using Windows Settings Method:
- Press Windows + I to open Settings
- Click Apps > Startup
- Toggle off programs you don’t need at startup
Which programs should you disable? Turn off programs like Spotify, Skype, Adobe updaters, and game launchers. Keep security software, Windows updates, and audio drivers enabled.
What System Services Can You Safely Disable?
Background services use computer resources even when you’re not using them. Many Windows services might not be essential for your day-to-day computing tasks and unnecessarily use system resources.
Steps to Disable Non-Essential Services:
- Press Windows + R and type msconfig
- Click the Services tab
- Check “Hide all Microsoft services” (important safety step)
- Click “Disable all” to turn off third-party services
- Click Apply and restart your computer
Services you can safely disable:
- Fax service (if you don’t use fax)
- Windows Search (if you don’t search files often)
- Print Spooler (if you don’t print documents)
- Tablet PC Input Service (on desktop computers)
How to Clean Temporary Files for Faster Boot?
Temporary files slow down disk access and affect boot performance. Windows accumulates temporary files over time that can indirectly affect boot time by slowing down disk access.
Clean Temp Files Using Run Commands:
- Press Windows + R and type %temp%
- Select all files with Ctrl + A
- Delete all files (skip files in use)
- Repeat with temp command for system temp files
Using Disk Cleanup Tool:
- Type “Disk Cleanup” in Start menu search
- Select your main drive (usually C:)
- Check boxes for Temporary files, Recycle Bin, and System cache
- Click “Clean up system files” for deeper cleaning
- Select file types to delete and click OK
How much space will you save? Cleaning temporary files can free up 1-5 GB of space, depending on your computer usage.
Should You Clear the Prefetch Folder?
Do not delete prefetch files – they help Windows boot faster. The prefetch folder is self-maintaining, and there’s no need to delete it or empty its contents. If you empty the folder, Windows and your programs will take longer to open.
Prefetch files contain information about the files and directories an application accesses when it starts up, serving as a roadmap that tells Windows exactly which pieces of data an application needs to load quickly.
What happens if you delete prefetch files?
- Windows takes longer to start next time
- Programs load more slowly during first launch
- System performance decreases temporarily
Windows maintains a maximum of 128 entries in the Prefetch folder and cleans itself automatically.
How to Optimize BIOS Settings for Faster Boot?
BIOS settings control what happens when you first press the power button. With a few simple changes to BIOS, you may be able to make your system start quicker.
BIOS Optimization Steps:
- Restart your computer and press F2, F12, or Delete during startup
- Look for “Fast Boot” or “Quick Boot” option and enable it
- Set boot order to prioritize your main drive (usually SSD)
- Disable unused hardware like legacy USB support or serial ports
- Save changes and exit BIOS
UEFI Fast Boot Options:
- Fast Boot: Basic optimization for faster startup
- Ultra Fast Boot: Ultra Fast option allows the motherboard UEFI to initialize all hardware at once vs sequentially
Warning: Fast boot may interfere with some encryption, security, or backup software that require full access to the system during boot process.
Which Windows Features Should You Turn Off?
Visual effects and animations use system resources during startup. Disabling certain features can speed up boot time without affecting functionality. Research from Smith College’s optimization studies confirms that visual effects optimization can significantly improve boot performance on both older and newer systems.
Disable Visual Effects:
- Right-click This PC > Properties
- Click Advanced system settings
- Click Settings under Performance
- Select “Adjust for best performance”
- Click Apply
Turn Off Background Apps:
- Press Windows + I > Privacy
- Click Background apps
- Turn off apps you don’t need running constantly
Background apps that use resources:
- Mail and Calendar (if you use web email)
- Maps (unless you need location services)
- People (if you don’t use Windows contacts)
How to Update Drivers for Better Boot Performance?
Outdated drivers can slow down the boot process. Hardware companies are always issuing driver updates, and if your drivers haven’t been updated in a while, they may slow down your PC’s boot time. Microsoft’s research shows that driver optimization is crucial for system startup performance, as outdated drivers can create bottlenecks during the boot process.
Manual Driver Update Method:
- Right-click Start button > Device Manager
- Look for devices with yellow warning signs
- Right-click problematic devices > Update driver
- Select “Search automatically” for drivers
Critical Drivers to Update:
- Graphics drivers (NVIDIA, AMD, Intel)
- Network drivers (Ethernet and WiFi)
- Storage drivers (SATA, NVMe)
- Audio drivers (Realtek, etc.)
How often should you update drivers? Check for driver updates every 2-3 months or when you notice performance issues.
What About Windows Update Cleanup?
Old Windows update files take up space and slow down boot. Windows stores temporary files in the Software Distribution folder for installing updates.
Clean Windows Update Cache:
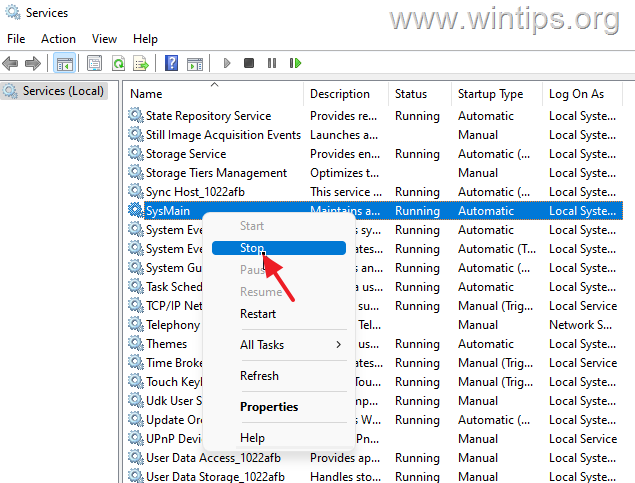
- Press Windows + R and type services.msc
- Find “Windows Update” service and stop it
- Navigate to C:\Windows\SoftwareDistribution\Download
- Delete all contents of the Download folder
- Restart Windows Update service
Using Storage Sense:
- Press Windows + I > System > Storage
- Click “Configure Storage Sense”
- Turn on Storage Sense
- Set it to run automatically every month
How to Defragment Your Hard Drive?
Hard drive fragmentation slows down file access during boot. This step only applies to traditional hard drives (HDD), not solid-state drives (SSD).
Check if You Have HDD or SSD:
- Type “defrag” in Start menu search
- Open “Defragment and Optimize Drives”
- Look at Media type column
Defragment HDD Only:
- Select your hard drive (not SSD)
- Click “Optimize”
- Wait for process to complete (may take hours)
Important: SSD users should NOT defragment their drives, as it can reduce their lifespan.
How to Disable Bloatware and Unnecessary Apps?
Pre-installed apps (bloatware) slow down startup and use system resources. Windows laptops often come with preloaded applications that are set to start on startup, such as McAfee Antivirus.
Uninstall Bloatware:
- Press Windows + I > Apps
- Click “Apps & features”
- Find unnecessary apps and click Uninstall
Common Bloatware to Remove:
- Trial antivirus software (if you have Windows Defender)
- Manufacturer utilities you don’t use
- Games you don’t play
- Toolbars and browser extensions
Can You Use System Configuration (MSConfig) for Boot Optimization?
MSConfig lets you control which services and programs start with Windows. This tool provides advanced options for boot optimization.
Advanced MSConfig Settings:
- Press Windows + R and type msconfig
- Click Boot tab
- Click “Advanced options”
- Check “Number of processors” and select maximum
- Set timeout to 3 seconds (default is 30)
Selective Startup Option:
- In General tab, select “Selective startup”
- Uncheck “Load startup items”
- Keep “Load system services” checked
- Click Apply and restart
Warning: Only use selective startup if you understand which services are essential for your system.
How to Monitor Boot Time Improvements?
Measuring boot time helps you track which optimizations work best. Using Task Manager, you can get a clear picture of your current boot time. Microsoft’s official performance optimization guide recommends monitoring boot metrics to identify which improvements provide the most benefit.
Check Boot Time in Task Manager:
- Press Ctrl + Shift + Esc
- Click Startup tab
- Look at “Last BIOS time” in top-right corner
Using Event Viewer Method:
- Press Windows + R and type eventvwr.msc
- Navigate to Applications and Services Logs > Microsoft > Windows > Diagnostics-Performance
- Look for Event ID 100 (boot performance)
What’s a good boot time? Most Windows PCs boot within 30 seconds, so anything more than one minute would be too slow.
Final Thoughts
Speeding up Windows boot time without upgrading hardware is possible with the right combination of software optimizations. The most effective methods include enabling Fast Startup, disabling unnecessary startup programs, and cleaning temporary files.
Start with the easiest fixes first: enable Fast Startup and disable startup programs you don’t need. These two changes alone can cut your boot time by 30-50%. Then move on to cleaning temporary files and optimizing BIOS settings for additional improvements.
Remember that boot time optimization is an ongoing process. Check your startup programs monthly, clean temporary files regularly, and keep your drivers updated. With these simple maintenance tasks, your Windows computer will continue to boot quickly without expensive hardware upgrades.
For more Windows optimization tips and Android device guides, explore our apps section and games section. You can also learn how to clone any Android app or record internal audio on Android for more advanced device customization.